Export to Excel in Node js

Leave a Comment

To export data in node js we will use exceljs module. So let's direct jump into the code. 

Let's first install this module using below command 

npm i exceljs

now create file name as exportToExcel.js and copy paste below code

const excel = require("exceljs");

function exportExcel() {
    let workbook = new excel.Workbook();
    let worksheet = workbook.addWorksheet("Straw Hat");

    let exportData = [];

    exportData.push({
        id: "1",
        name: "Monkey D. Luffy",
        designation: "Captain",
        description: "The Captain of the Straw Hat Pirates"
    }, {
        id: "2",
        name: "Roronoa zoro",
        designation: "Swordsmen",
        description: "The Swordsmen of the Straw Hat Pirates"
    }, {
        id: "3",
        name: "Vinsmoke Sanji",
        designation: "Cook",
        description: "The cook of the Straw Hat Pirates"
    })

    worksheet.columns = [
        { header: "Id", key: "id", width: 25 },
        { header: "Name", key: "name", width: 25 },
        { header: "Designation", key: "designation", width: 25 },
        { header: "Description", key: "description", width: 25 },
    ];

    worksheet.addRows(exportData);

    workbook.xlsx.writeFile('One_Piece.xlsx');

}

exportExcel()

It's simple code first we import excel js in our code, then let's create workbook variable and add worksheet as "Straw Hat". We can add multiple worksheet in one excel file for different different data.


After that let's create array of data which we want to export in excel. after that let's add the column in worksheet with mapping of data, header value as column name and id value as data key name which we have to map to that column name. 


worksheet.addRows() function takes array of data as parameter and create worksheet with data and finally we will use workbook write file function to create a file with excel file name parameter. 


When we run this file node exportToExcel.js then it will automatically create the One_Piece.xlsx in folder with above json data.



How node works

Leave a Comment

So as we know node js application are highly-scalable and this is because of the non-blocking or async nature of node js.


What do I mean by async nature of node js??


Asynchronous programming is a design pattern which ensures the non-blocking code execution

Non blocking code do not prevent the execution of piece of code. In general if we execute in Synchronous manner i.e one after another we unnecessarily stop the execution of those code which is not depended on the one you are executing this is how application build with framework like ASP.net and rails works out of the box.


Asynchronous does exactly opposite, asynchronous code executes without having any dependency and no order. This improves the system efficiency and throughput.


So when we receive a request on the server a thread is allocated to handle that request. And suppose in that request we have to fetch data form database as we all know sometime querying a DB takes a time.


When the database is executing the query that thread will be wait for the result and imaging what would happen if we have a large number of concurrent client at some point we are going to run out of threads for new client have to wait until threads are free. If we don’t want then to wait then we have to add more threads to server which more hardware and cost. 


So this is the problem with blocking or sync architecture and as I explained that how’s application build with framework like asp.net work by default. We can also have async architecture in asp.net but we have to extra work for that.

But Node js application are async by default so we don’t have to do anything extra. In node we have a single thread to handle all request when request arrives that single thread is used to handel that request if we need to query a DB our thread doesn’t have to wait for the db to return the data. While the db is executing our query the thread used to serve another request. 


Once DB ready with result it puts a message in what we call an event queue. Node is consistently monitoring this event queue in the background. When it find an event in this queue it will take it out and process it. This kind of architecture makes node js ideal for building applications that include a lot of disk or network access. We can serve more client without the need to throw in more hardware. And that why node application are highly scalable. Node should not be used in CPU-intensive apps such as a video encoding service. Because while executing these operations, other clients have to wait for the single thread to finish its job and be ready to serve them. Node should only be used for data intensive and real time application


What is node js architecture

Leave a Comment

 In last blog we learnt that what is node js ?, Node is runtime environment. 


But what is run time environment really??


Well, before node we used JavaScript only to build application that run inside as browser, so every browser having JavaScript engine that takes JavaScript code and convert into machine code or code which computer can understand and execute the code but what are the engine which used by browser

Below is the list of browsers with their JS engine

  • Microsoft edge uses chakra.
  • Firefox uses Spider monkey.
  • Chrome uses V8.


So due to variety of these engine some time JavaScript code behave differently in one browser and another browser. Browser provide runtime environment for JavaScript code.


document.getElementById('')
 

For e.g. in browser we have windows or document object these object allows us to work with environment in which code is running.


Up to 2009 JavaScript code was running In browser, In 2009 Ryal dahl creator of node came up with brilliant idea. He thought let’s execute JavaScript outside the browser so he took google V8 engine which is the fastest JavaScript engine and embedded in C++ program called that programming node. 


So similar to browser node is runtime environment for JavaScript code. It contains the JavaScript engine that can execute JavaScript code but it also have certain object that provide and environment for a JavaScript code but these object are different form environment object having a browser. 


For e.g. In node js we don’t have document object instead of that we have other object which gives more interesting capability. For e.g. we can work with file system or listing for request on given port and so on. We can’t do stuff like this on browser.


So  basically node is program that include JavaScript v8 engine plus some additional module that give us capability not available inside the browser we can work with the file system or the network and so on.


Chrome and node share the same JavaScript engine but they provide diff runtime environment for java script.


Node is not an programming language, Node is also not an framework it’s runtime environment for executing JavaScript code.


So don’t compare node js with C# and ASP.net


What is Node js?

Leave a Comment

Node is Open source and cross platform run time environment for executing JavaScript code outside of a browser.


We generally use node to build back-end service also called API or application programming interfaces.


These are the service that used by frontend application or client applications. For example, mobile app running in mobile phones or web app running inside of web browser. These client apps are simply what the user sees and interacts with. They are just a surface, they need to talk to some service on the web server to store data or send emails, push some notification and so on.


Node is ideal for building highly-scalable, data-intensive and real time back-end service that power our client application


But there us also more application to use as back-end service. So, what's so special about node??


What's so special about node??

Node is easy to get started and can be used for prototyping and agile development but it can also be used for building super-fast and highly scalable service


it's used in production by large companies such as paypal, uber, netflix and so on


IN paypal they re-build there entire java and spring based application using node and found that the node application was build twice as fast with fewer people in 33% fewer lines of code 40% fewer files and more importantly they doubled the number of request served per second while decreasing the average response time by 35%, so node js is an excellent choice for building highly scalable services.


Another reason for using node, is that in node applications we use JavaScript, so if you are front end developer and know JavaScript , you can reuse your JavaScript skill and transition to a full stack developer and get as better job with better pay you don't have to learn a new programming language. also because you can use JavaScript both on front end and on the back end your source code will be cleaner and more consistent so you would use the same naming convention, the same tools and same best practices.


Finally another reason for using node is it has the largest ecosystem of open source libraries available to you so for pretty much any features or building blocks you want to add your application there is some free open sourced library out there that you can use so you don't have to build these building blocks from scratch and instated you can focus on the core of your application.

$match and $group Aggregation Stages - MongoDB Aggregation Tutorial For Beginner

Leave a Comment
After introduction of group stage let's combine $match and $group stages. So direct jump to example using our person collection.
db.getCollection("person").aggregate([ 
 {$match:{country:"China"}},   // stage 1
 {$group:{_id:{age:"$age", gender:"$gender",}}}   // stage 2
]);
In above example first we use match stage where we find all document whose country is china and next group stage and finally we will get documents with _id set to have embedded document with two filed age and gender, so remember all document in person collection go to match stage first we will filter and find only document whose country is china and then resulting document will go to group stage and group will produce brand new documents that will contain all possible combination of age and gender of the document came out from match stage. Result shown below in image.

$match and $group Aggregation Stages - MongoDB Aggregation Tutorial For Beginner

Now let's switch both stages means first we will see group stage and after that match stage so let's try below example in ROBO 3T.
db.getCollection("person").aggregate([ 
  {$group:{_id:{age:"$age", gender:"$gender",}}},   // stage 1
  {$match:{country:"China"}} // stage 2
]);
Above example's result will be empty because order of aggregation stage is wrong. In above query first stage output will be _id with embedded document of all possible combination of age and gender after that in second stage we are trying to filter document whose country is China but in this example first stage only contain _id fields as output so when it pass to second stage and try to match with country we get empty result. So in aggregation, order of aggregation execution is also important to get expected result.

Please comment down below if you have any query and please follows us for more awesome tutorials and keep motivating us .

$group Aggregation Stages - MongoDB Aggregation Tutorial For Beginner

Leave a Comment
In Last tutorial we have seen $match stage now we will see how $group stage works so let's begin.
$group stage is very important stage of aggregation because it is use often in aggregation query. Groups documents by some specified expression and outputs to the next stage a document for each distinct grouping. Let's look in to syntax.

$group Aggregation Stages Syntax

{ $group: { _id: <expression>, <field1>: { <accumulator1> : <expression1> }, ... } }
The _id field is mandatory other are optional, we can specify an _id value of null, or any other constant value. Now let's see how it's works, before group stage we have set of documents, those document has certain fields and if we want to group those document by certain fields name, then we should use these fields name as expression on the right side of _id as key value pair and as a result we will get documents with one fields _id and values which will depend on field we use in expression. It may sound difficult but when we start working with it will get easy let's look in to example.
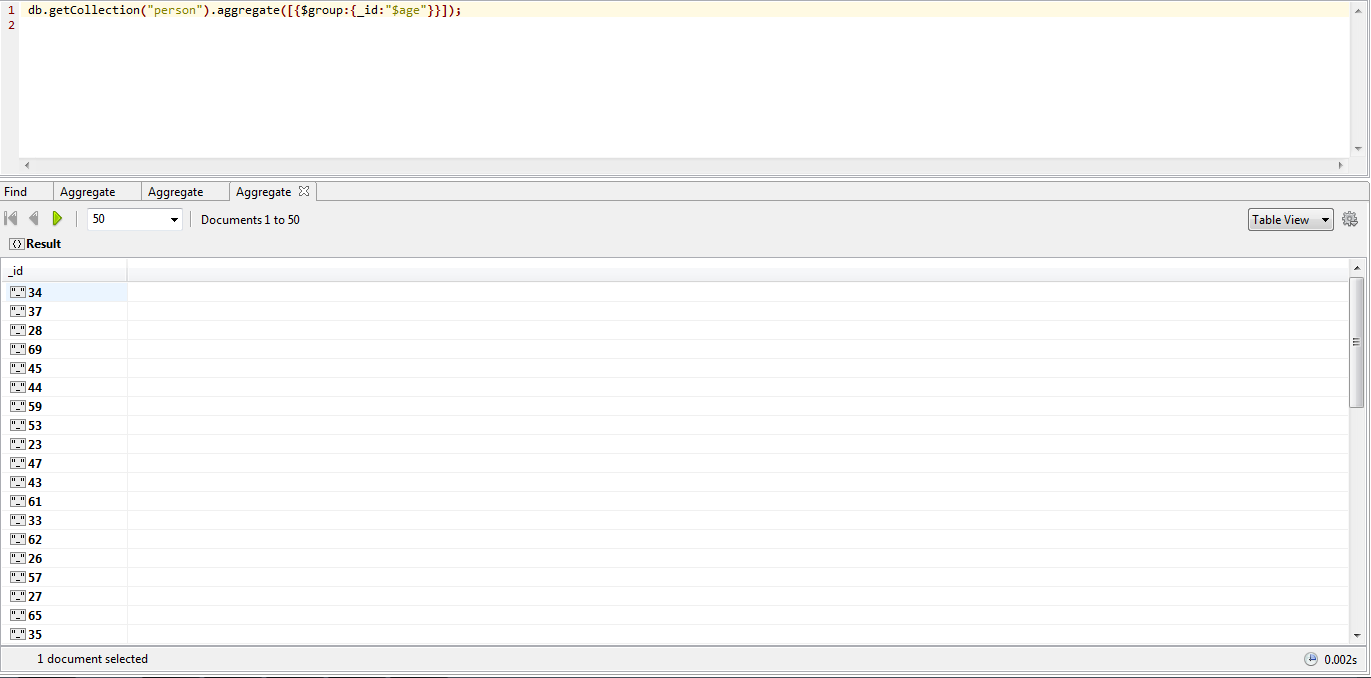
 db.getCollection("person").aggregate([{$group:{_id:"$age"}}]);
In above example we grouping documents by age fields and finding distinct values of age fields and then producing new set of document and each of new document have just one field name _id. Values will be distinct values of age fields of input documents e.g. shown in below image.

$group Aggregation Stages Example


Lets look in to another example
db.getCollection("person").aggregate([{$group:{_id:{age:"$age",gender:"$gender"}}}]);
Second example we grouping data with two fields age and gender, so we will find unique pair document of age and gender and output as separate document. each output have nested document as values. These nested documents will have two fields age and gender. Below image is output of second query.

$group Aggregation Stages Example

Above was just introduction of $group stage. We will see more in detail and more example and combination of $match and $group stage in next tutorials.

Please comment down below if you have any query and please follows us for more awesome tutorials and keep motivating us .

$match Aggregation Stages - MongoDB Aggregation Tutorial For Beginner

Leave a Comment
Now let's talk about mongodb Aggregation stages and first stage will $match stage. We already familiar with mongodb query. Match Stages use query as argument and same as find method so its easy to learn.

$match aggregation stages syntax

{ $match: { <query> }}

$match example

{$match:{country:"Poland"}}
{$match:{age:{$gt:"20"}}}
So first example query looking for all document whose city is Poland and second example age greater than 20, all document where field age is greater than 20. Match use standard MongoDB queries and support all query operation. Next we look match query with our database.

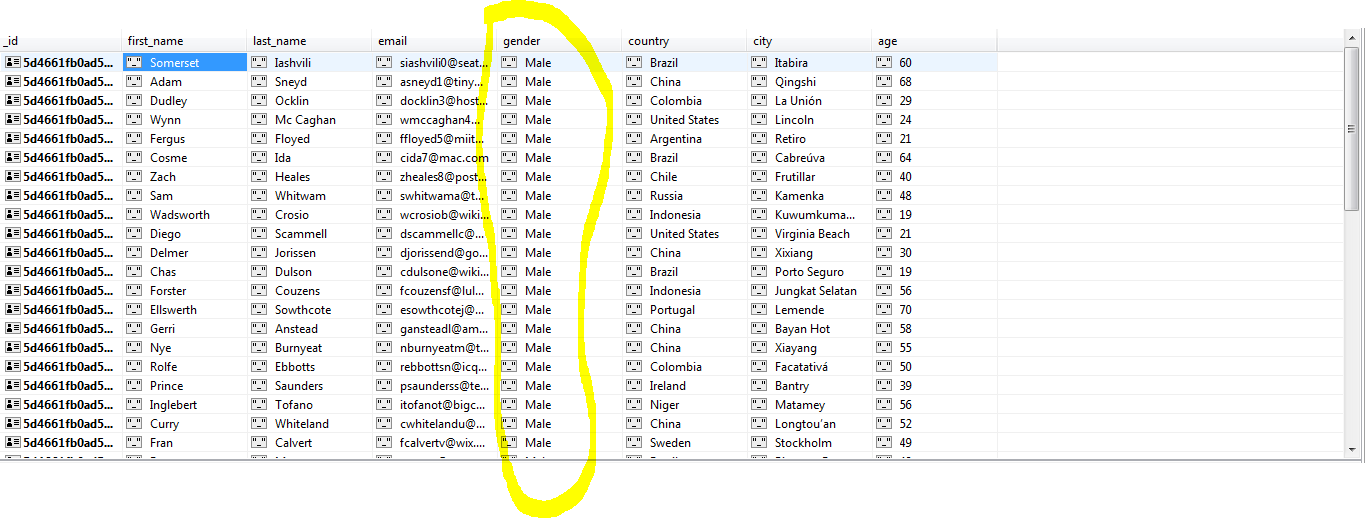
db.getCollection("person").aggregate([{$match:{gender:"Male"}}]);
In above query, we get all data whose gender is male you can see in below image.

$match Aggregation Stages

Aggregate $match query is same as mongodb find method with query arguments. Next tutorials we will see $group aggregation stages.

Please comment down below if you have any query and please follows us for more awesome tutorials and keep motivating us .

Aggregation Stages - MongoDB Aggregation Tutorial for beginner

Leave a Comment
In Last tutorial we have seen basic concept of mongodb aggregation. In this tutorial we gonna take tour of mongodb aggregation stages.

For this whole tutorials series i am gonna use ROBO 3T to execute mongodb query. you can download ROBO 3T software from this website https://robomongo.org/ and download database from this google drive link.

Mongodb Aggregation without any stages

In Previous blog we have seen syntax of mongodb aggregate function so let's execute simple aggregate query on our student collection.
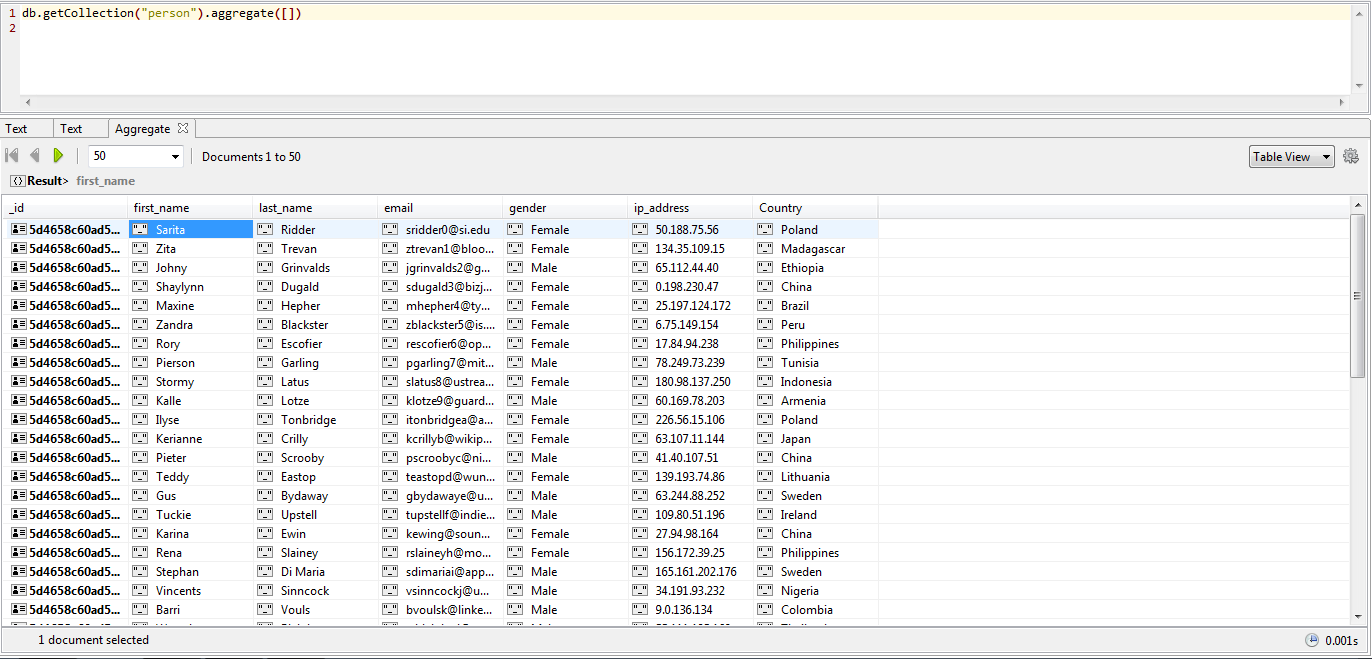
db.getCollection("person").aggregate([]);

Mongodb Aggregation without any stages

In above query we pass blank array as an argument to mongodb aggregate and as a result we get all document of collection it's means without any stages aggregate produce same result like mongodb find method with empty query. let's execute find method of mongodb.
db.getCollection("person").find({});

Mongodb Find method

If you see both query produce same result. Now let's talk about aggregation stages.

Aggregation Stages

Let's discuses more deeper what is aggregation stage? which stage are exist in mongodb aggregation framework. Each stage work independently, each stage take input of document then perform its operation and produce output document. Some stages produce same document as input document like sort and limit stages or it can be produce new document when we use group stages. Let's look stages operator

Aggregation Stages Operators

{ $<stageoperator> : {} }
Each stage start from stage operator append with $ sign then comes object, object contain key value pair let's see and example
{ $match : {score: {$gt:20} } }
{ $sort : { count: -1} }
In above example we can see match and sort stage shown, we will discuses each stage operator individually later in this tutorials. For now you just remember how to construct stage. Below are some mongodb aggregation stages with quick overview.

  • $match: It is use filter document based on certain query, this help to reduce document which are gonna pass to next stage.
  • $group: Group document using certain criteria.
  • $project: Filter fields in documents.
  • $unwind: Unwind takes an array field and separate each array fields in to documents.
  • $sort: Sorts the documents.
  • $count: Count number of objects documents.
  • $limit: Limit number of documents.
  • $skip: Skip certain amount of documents.
  • $out: Out writes aggregation result in to another collections.


Please comment down below if you have any query and please follows us for more awesome tutorials and keep motivating us .

Introduction to the Aggregation Framework - MongoDB Aggregation Tutorial for beginner

Leave a Comment
Hello guy's Today we are gonna talk about mongoDB Aggregation framework. It is most powerful tool that mongodb offers us. Using aggregation framework we can group document by using specific condition. We can also add more fields during group such as Avg, Min, Max and so on. We can process collection document's in several stages one by one.

Aggregation process is very fast so aggregation query respond very fast. Aggregations operations process data records and return computed results.

Aggregation Syntax

Aggregation framework uses its special method called us aggregate(). Basic syntax of mongodb aggregation as shown below.
db.collectionName.aggregate([<stage1>,<stage2>,...<stageN>]);

Document during aggregation process and pass through the stages. Aggregate method needs one argument as a array, array of stages and each stages separated by comma.

In beginning all document pass to stage 1 then document process to stage 1 and result of processing document pass to stage 2 and stage 2 take document from stage 1 and process and result pass to stage 3 and so on. When last stage process its execution result are return back to client. Aggregation return cursor form the server.

Aggregation Process


Below image shown how mongodb aggregation works.


Above images shown overview of mongodb aggregation. In above image let suppose we have some document in collection so whole collection is shown in diagram.

First we perform match operation like we do in normal mongodb query like find, update and delete. This match query produce subset of document then we can take subset of document and perform group operation as a result of group operation we get brand new subset.

In mongodb aggregation we can group document based on certain condition and as a result we get new document and each document will represent each group.

Aggregation Pipeline


Mongodb support pipeline concept in aggregation framework. Pipeline means take set of document as input and generate a result set of documents (or the final resulting JSON document at the end of the pipeline). This can then in turn be used for the next stage and so on. Pipeline result set make documents smaller smaller and at the end we get group of documents. Again this high level diagram which shown above later in course we will dive in details.

Next Tutorial: Aggregation Stages - MongoDB Aggregation Tutorial for beginner

Please comment down below if you have any query and please follows us for more awesome tutorials and keep motivating us .

How to serve static file in express js

Leave a Comment
To serve static files such as images, CSS files, and JavaScript files, we can use built-in middleware function in Express. i.e. express.static
we simply need to pass the name of the folder where we have our static files, to the express.static middleware to start serving the files directly. For example, if you keep your images, CSS, and JavaScript files in a folder named public, we can use below code −
app.use(express.static('public'));
Now, you can load the files that are in the public directory:
http://localhost:3000/images/hello.jpg
http://localhost:3000/css/hello.css
http://localhost:3000/js/hello.js
http://localhost:3000/images/hello.png
http://localhost:3000/hello.html
Express looks up the files relative to the static directory, so the name of the static directory is not part of the URL.
To use multiple static assets directories, we can call the express.static middleware function multiple times:
app.use(express.static('public'))
app.use(express.static('files'))
Express looks up the files in the order in which you set the static directories with the express.static middleware function.

To create a virtual path prefix (where the path does not actually exist in the file system) for files that are served by the express.static function, specify a mount path for the static directory, as shown below:
app.use('/static', express.static('public'))
Now, we can load the files that are in the public directory from the /static path prefix.
http://localhost:3000/static/images/hello.jpg
http://localhost:3000/static/css/hello.css
http://localhost:3000/static/js/hello.js
http://localhost:3000/static/images/hello.png
http://localhost:3000/static/hello.html
However, the path that you provide to the express.static function is relative to the directory from where you launch your node process. If you run the express app from another directory, it’s safer to use the absolute path of the directory that you want to serve:
app.use('/static', express.static(path.join(__dirname, 'public')))


Please comment down below if you have any query and please follows us for more awesome tutorials and keep motivating us .

Node js with express framework

Leave a Comment

What is express

Express is node js web application framework which provide set of feature to develop web and mobile applications. It provides following features.

  1. Robust routing
  2. Focus on high performance
  3. Super-high test coverage
  4. HTTP helpers (redirection, caching, etc)
  5. View system supporting 14+ template engines
  6. Content negotiation
  7. Executable for generating applications quickly

How to install expressjs

$ npm install --save express
The above command saves the installation locally in the node_modules directory and creates a directory express inside node_modules.

Hello world in express js

var express = require('express')
var app = express()

app.get('/', function (req, res) {
  res.send('Hello World From express!')
})

app.listen(3000, function () {
  console.log('Example app listening on port 3000!')
})
Save above file as app.js.The app starts a server and listens on port 3000 for connections. The app responds with “Hello World From express!” for requests to the root URL (/) or route. For every other path, it will respond with a 404 Not Found.
Run the app with the following command:
$ node app.js

Then, load http://localhost:3000/ in a browser to see the output.


Hello world in express js


Please comment down below if you have any query and please follows us for more awesome tutorials and keep motivating us .

What is Node package manager

Leave a Comment
After my first tutorials which is How to create server in node js i want to explain what is node package manager. Because after this tutorials we gonna look in how's node module works. So let's start with what is node package manager.

Node package manager is online repositories for node.js packages/modules. To install node package and do version management we have to use commands.
To check current NPM version on your computer type below command
$ npm --version

If you running old version than you can update easily by running below commnand
$ sudo npm install npm -g

How to install module using npm

Using below command you can install module in node
$ npm install 
Suppose you want to install express module of node then you have to type below command.
$ npm install express

Global vs local module installation

By default npm install local module to use local module you can use require method. To check which module is install locally you use below command
$ npm ls
To install global module you can use below command.
$ npm install  -g
You can use the following command to check all the modules installed globally
$ npm ls -g

Package.Json file

by typing below command you can generate package.json file
$ npm init
If you want to save you locally module in package.json file you can type below command
$ npm install --save express
Above command will save your module name and installed version in package.json file

Uninstall module

Use the following command to uninstall a Node.js module.
$ npm uninstall express


Updating a Module

Update package.json and change the version of the dependency to be updated and run the following command.
$ npm update express


Search a Module

Search a package name using NPM.
$ npm search express


Please comment down below if you have any query and please follows us for more awesome tutorials and keep motivating us .

How to create server in node js

Leave a Comment
Hello guy's After working 3 years in node i finally decided to write tutorials on node. When i started node js i also faced so many challenge so i know how to overcome with this challenges. so let's start with first node js tutorial.

Today we will start first thing which i did in node js. Node create its own webserver so we will learn today how to create server in node js as your first application in node js.
Before we start i hope you already install node js on computer. Let's start with hello world in node js application. Node having 3 important things.


  1. Import module: In node js when we have to import any module we have to use require directive to load node module.
  2. Create server: Server which help to listen client request
  3. Read and response request: The server created in an earlier step will read the HTTP request made by the client which can be a browser or a console and return the response.

Let's start with our app.
var http = require("http");

var server = http.createServer(function(req,res){
  res.end("<h1>Hello world</h1>");
});

server.listen(3000);

console.log("Server running on port 3000");

If you copy above code in your text editor and save file as server.js and run command node server.js then you will get this output.


How to create server in node js
Now let's see what happening in our code.

var http = require("http");

we have to use require directive to use http module. http module is inbuilt module in node. so we don't need install http module we can directly use that module in our app.
var server = http.createServer(function(req,res){
  res.end("<h1>Hello world</h1>");
});
server.listen(3000);


As we talked above our second important thing is creating server. http.createServer method use for creating server and listen method is use to bind our app to server port.Above code basically create our http server which is gonna listen on 3000 port.
var server = http.createServer(function(req,res){
  res.end("<h1>Hello world</h1>");
});
server.listen(3000);


Our third step is to get request and process request to send response. In createServer function we pass parameter req,res to handle that request and process response.

when server is created createServer function call its callback function with req,res parameter. req parameter handle request and res parameter send hello world response to browser. Finally you have your first app running in your pc.

If you have any queries or you want any help or you want to request any tutorials you can comment in comment section

Please comment down below if you have any query and please follows us for more awesome tutorials and keep motivating us .

How to enable mod_rewrite in apache2

Leave a Comment
In Previous tutorials we looked how to mod_rewrite in windows xammp today we are gonna learn how to enable mod_rewrite in apache2. Here is some command which we have to follow.

To check whether mod_rewrite is enabled:

Look in mods_enabled for a link to the module by running


ls /etc/apache2/mods-enabled | grep rewrite

If this outputs rewrite.load then the module is enabled. (Note: your path to apache2 may not be /etc/, though it's likely to be.)

To enable mod_rewrite if it's not already:

To Enable the module we have to execute below commands

a2enmod rewrite


Now restart apache2 server

service apache2 restart


After restart check phpinfo file in browser. you will get mod_rewrite module enable in apache2


Helpful links


Please comment down below if you have any query and please follows us for more awesome tutorials and keep motivating us .

how to enable mod_rewrite in xammp windows

Leave a Comment
When we start learning codeigniter remove index.php form url is biggest challenge for us. There is so many tutorials to remove index.php from url even i also written tutorials for remove index.php from url but there is so less tutorials which tell main steps of enable mod_rewrite in xammp. so let's start with this

There is some steps which we have to follow to check mod_rewrite is enable or not in our xammp. lets start with those steps


  1. Check mod_rewrite is enable or not: To check mod_rewrite is enable or not in xammp we have to write some php code for that purpose.
    <?php
    /**
    * to check which module is enable on server
    */
    echo phpinfo();
    ?>


    check in Loaded Modules or search for mod_rewrite in output. if you don't find mod_rewrite in loaded module in we have to enable that module.
  2. How to enable module: To activate the module, the following line in httpd.conf needs to be active:
    LoadModule rewrite_module modules/mod_rewrite.so


    enable mod_rewrite in xammp


    Remove hash form the that line and save that file after that restart your apache server and reload that page in browser. you will module is loaded in our xammp server.


You can watch video for how to enable mod_rewrite in xammp windows


Helpful links


Xammp port 443 already use issue

Leave a Comment
Hello guy's today i am going to show u how to solve already port issue in xammp. Some times when you start xammp you will get this kind of error which is shown in below image


xammp already used 443 port issue


Now how to solve this kind of issue so here is the solution follow this steps :D 


Here is the solution step-by-step: 
  1. Open up httpd-ssl.conf.  
  2. Look for the line Listen 443  
  3. Change port number to anything you want. I use 4430. ex. Listen 4430.  
  4. Replace every 443 string in that file with 4430.  
  5. Save the file.
After saving file click on start again of apache now it will be work


Xammp port 443 already use issue solve


Helpful links


How to export to excel in codeigniter 3

Leave a Comment
Today we gonna learn how to export to excel in codeigniter 3 without using any library. Download codeigniter and i already created test database. lets check our database


We are ready with our database lets start with controller i.e. ExportExcel.php
<?php
defined('BASEPATH') OR exit('No direct script access allowed');

class ExportExcel extends CI_Controller {

 function __construct()
 {
  parent::__construct();
  $this->load->database();
 }
 

 public function exportExcelData($records)
 {
  $heading = false;
        if (!empty($records))
            foreach ($records as $row) {
                if (!$heading) {
                    // display field/column names as a first row
                    echo implode("\t", array_keys($row)) . "\n";
                    $heading = true;
                }
                echo implode("\t", ($row)) . "\n";
            }
 }

 public function fetchDataFromTable()
 {
  $query =$this->db->get('one_piece_characters'); // fetch Data from table
  $allData = $query->result_array();  // this will return all data into array
  $dataToExports = [];
  foreach ($allData as $data) {
   $arrangeData['Charater Name'] = $data['name'];
   $arrangeData['Charater Profile'] = $data['profile'];
   $arrangeData['Charater Desc'] = $data['description'];
   $dataToExports[] = $arrangeData;
  }
  // set header
  $filename = "dataToExport.xls";
                header("Content-Type: application/vnd.ms-excel");
                header("Content-Disposition: attachment; filename=\"$filename\"");
  $this->exportExcelData($dataToExports);
 }
}

Now hit this url http://localhost/ci_tuts/index.php/ExportExcel/fetchDataFromTable. After hitting this url you will get your excel sheets.

Please comment down below if you have any query and please follows us for more awesome tutorials and keep motivating us .

Helper in codeigniter

Leave a Comment
Helpers, What is Helpers as the name suggests, help you with your work. Codeigniter helpers are do same thing. CodeIgniter has more than 20 helpers. Each helper file is simply a collection of functions in a particular category. Most of codeigniter helpers you use in your project. There are URL Helpers, that assist in creating links, there are Form Helpers that help you create form elements, Text Helpers perform various text formatting routines, Cookie Helpers set and read cookies, File Helpers help you deal with files, etc.

Unlike most of the other framework codeigniter helpers are not in OO(Object Oriented) format. Codeigniter helpers are simple, procedural functions. Each helper function performs one specific task, with no dependence on other functions.

Loading Helper in codeigniter at global level

Codeigniter not load helper file by by default. We have to load helper file name in config/autoload.php. After loading helper in atuoload.php file helper is globally available in your controller and views.
/*
| -------------------------------------------------------------------
|  Auto-load Helper Files
| -------------------------------------------------------------------
| Prototype:
|
| $autoload['helper'] = array('url', 'file');
*/

$autoload['helper'] = array('url','form');

Loading Helper in codeigniter at Controller level

Loading a helper file is quite simple using the following function:
$this->load->helper('name of your helper'); 
Where name is the file name of the helper, without the .php file extension or the "helper" part. For example, to load the URL Helper file, which is named url_helper.php, you would do this:
$this->load->helper('url');
You can load helper anywhere within your controller functions (or even within your View files, although that's not a good practice), as long as you load it before you use it. You can load your helpers in your controller constructor so that they become available automatically in any function, or you can load a helper in a specific function that needs it.
$this->load->helper( array('url', 'file', 'form') ); 
Using above method you can load multiple helper at one time, you can specify them in an array.

Send Email With Attachment Codeigniter

Leave a Comment
After Send email with codeigniter and Send email with codeigniter and smtp today we gonna look how to send email with attachment. Before we start i hope you know how to upload image in codeigniter. Because this tutorial is combination of the send email with codeigniter and upload image or attachment in folder. So let's start with controller i.e. Send_email.php
<?php if ( ! defined('BASEPATH')) exit('No direct script access allowed');

class Send_email extends CI_Controller {

 function __construct(){
    parent::__construct();
 }

 public function sendEmail()
 {
    if($this->input->post('send_email') == 'send_email'){
             $this->load->library('email');
             
              $config['upload_path'] = './uploads/';
              $config['allowed_types'] = 'gif|jpg|png';
              $config['max_size'] = '100000';
              $config['max_width']  = '1024';
              $config['max_height']  = '768';

             $this->load->library('upload', $config);
             $this->upload->do_upload('attachment');
             $upload_data = $this->upload->data();
             
             $this->email->attach($upload_data['full_path']);
             $this->email->set_newline("\r\n");
             $this->email->set_crlf("\r\n");
             $this->email->from('only4ututorials@gmail.com'); // change it to yours
             $this->email->to($this->input->post('email_id')); // change it to yours
             $this->email->subject($this->input->post('subject'));
             $this->email->message($this->input->post('body'));
             if ($this->email->send()) {
                 echo "Mail Send";
                 return true;
             } else {
                 show_error($this->email->print_debugger());
             }
    }else{
      $this->load->view('email_view');
    }
 }

}

Now lets start with view i.e. email_view.php
<!DOCTYPE html>
<html lang="en">
<head>
 <meta charset="utf-8">
 <title>Mass Email Example</title>
 <link rel="stylesheet" href="http://maxcdn.bootstrapcdn.com/bootstrap/3.3.5/css/bootstrap.min.css">
 <script src="//code.jquery.com/jquery-1.11.3.min.js"></script>
 <script src="http://maxcdn.bootstrapcdn.com/bootstrap/3.3.5/js/bootstrap.min.js"></script>
</head>
<body>
 <div class="container">
  <h1>Email Example With attchment</h1>
  <form action="<?php echo base_url()?>senddatabase_email/sendMassEmail" method="POST" enctype='multipart/form-data'>
    <div class="form-group">
      <label for="exampleInputEmail1">Enter Email</label>
      <input type="email" class="form-control" placeholder="Enter Email id" name="email_id"/>
    </div>
    <div class="form-group">
      <label for="exampleInputEmail1">Enter Subject</label>
      <input type="text" class="form-control" placeholder="Enter Email Subject" name="subject"/>
    </div>
    <div class="form-group">
      <label for="exampleInputPassword1">Body Content</label>
      <textarea class="form-control"  rows="3" placeholder="Enter Email Body Content" name="body"></textarea>
    </div>
    <div class="form-group">
      <label for="exampleInputFile">File input</label>
      <input type="file" id="exampleInputFile" name="attachment">
    </div>
    <button type="submit" name="send_email" value="send_email" class="btn btn-default">Submit</button>
  </form>
 </div>
</body>
</html> 

Send Email With Attachment Codeigniter


After filling all form when user click on submit function goes to sendEmail function which is written inside Send_email controller. To send attachment with email we use attach() function of email library.
$this->email->attach()

This above function enables you to send an attachment. Put the file path/name in the first parameter. Note: Use a file path, not a URL. For multiple attachments use the function multiple times. To pass file path we have to upload attachment in folder and make sure folder must be writable (666, or 777). After uploading attachment we get all uploaded data in $upload_data. $upload_data is array we need only full_path key value to do we have do something like this
$upload_data = $this->upload->data();
$this->email->attach($upload_data['full_path']);

After that we are ready to send email to user with attachment.

Please comment down below if you have any query and please follows us for more awesome tutorials and keep motivating us .

Ajax Pagination in Codeigniter

Leave a Comment
We already did normal Pagination With Codeigniter. If you don't know how pagination is work in codeigniter then please go through first that tutorials.

In previous tutorial we already created all needed file for our pagination so let's continue with those files. Below image was our file structure.

Ajax Pagination in Codeigniter


For ajax pagination let's update our controller file i.e. pagination.php
<?php if ( ! defined('BASEPATH')) exit('No direct script access allowed');

class Pagination extends CI_Controller {

 function __construct(){
  parent::__construct();
  $this->load->model('mdl_pagination');
  $this->load->library('table');
  $this->load->helper("url");
 }

 public function country($offset=null)
 {
  $this->load->library('pagination');

  $config['base_url'] = base_url().'pagination/country/';    // url of the page
  $config['total_rows'] = $this->mdl_pagination->countcountry(); //get total number of records 
  $config['per_page'] = 10;  // define how many records on page
  $config['full_tag_open'] = '<ul class="pagination" id="search_page_pagination">';
  $config['full_tag_close'] = '</ul>';
  $config['cur_tag_open'] = '<li class="active"><a href="javascript:void(0)">';
  $config['num_tag_open'] = '<li>';
  $config['num_tag_close'] = '</li>';
  $config['cur_tag_close'] = '</a></li>';
  $config['first_link'] = 'First';
  $config['first_tag_open'] = '<li>';
  $config['first_tag_close'] = '</li>';
  $config['last_link'] = 'Last';
  $config['last_tag_open'] = '<li>';
  $config['last_tag_close'] = '</li>';
  $config['next_link'] = FALSE;
  $config['next_tag_open'] = '<li>';
  $config['next_tag_close'] = '</li>';
  $config['prev_link'] = FALSE;
  $config['prev_tag_open'] = '<li>';
  $config['prev_tag_close'] = '</li>';
  $config['page_query_string'] = FALSE;

  $this->pagination->initialize($config);

  $data['country'] = $this->mdl_pagination->getcountries($config['per_page'],$offset);
  $this->load->view('pagination',$data);
 }

}

We just added few parameter in pagination config for some basic design. Now lets update our view file
<html>
<head>
 <link rel="stylesheet" href="http://maxcdn.bootstrapcdn.com/bootstrap/3.3.5/css/bootstrap.min.css">
 <script src="//code.jquery.com/jquery-1.11.3.min.js"></script>
 <script src="http://maxcdn.bootstrapcdn.com/bootstrap/3.3.5/js/bootstrap.min.js"></script>
</head>
<body>
 <div id="container">
  <h1>Countries</h1>
  <div id="body">
  <?php
   $this->table->set_heading('id', 'code', 'name');
   echo $this->table->generate($country);
   echo $this->pagination->create_links();
  ?>
  </div>
 </div>
   <script type="text/javascript">
   $(function(){
    $('body').on('click','ul#search_page_pagination>li>a',function(e){
      e.preventDefault();  // prevent default behaviour for anchor tag
      var Pagination_url = $(this).attr('href'); // getting href of <a> tag
     $.ajax({
      url:Pagination_url,
      type:'POST',
      success:function(data){
       var $page_data = $(data);
       $('#container').html($page_data.find('div#body'));
       $('table').addClass('table');
      }
     });
    });
   });
  </script>
</body>
</html>

this is our view file we don't need to change in modal file for this. Now you are wondering what's going on view file i will explain but first let's check how our view file look like.

Ajax Pagination in Codeigniter


Let's back to our code i hope you know jquery because we are using jquery with ajax. All magic goes with this below code.
<script type="text/javascript">
   $(function(){
    $('body').on('click','ul#search_page_pagination>li>a',function(e){
      e.preventDefault();  // prevent default behaviour for anchor tag
      var Pagination_url = $(this).attr('href'); // getting href of <a> tag
     $.ajax({
      url:Pagination_url,
      type:'POST',
      success:function(data){
       var $page_data = $(data);
       $('#container').html($page_data.find('div#body'));
       $('table').addClass('table');
      }
     });
    });
   });
  </script>

After document load if user click on one of the pagination link then we have to first remove default behaviour of anchor tag to remove that we use
e.preventDefault();
after that using "this" we got url of that clicked anchor tag after that call that url using ajax method. on success function of ajax we getting return data in "data params". We store that "data params" in jquery "$page_data". After that we have to find "div#body" from "$page_data" because all our pagination data in that div. After finding data we have to replace old data with new data in "#container" div. We will get next page data on our same page without refreshing page. The last line
$('table').addClass('table');
is just for design part. I am using same controller function for fist time load and ajax call you can separate both function and also i am loading same view for both call you can also separate both file then you don't need to write so much jquery in ajax success function you have just do something like this
success:function(data){
       $('#container').html(data));
       $('table').addClass('table');
      }

I did this all thing because to give you optimize code for ajax pagination in codeigniter.

Please comment down below if you have any query and please follows us for more awesome tutorials and keep motivating us .
Powered by Blogger.