
We already did normal Pagination With Codeigniter. If you don't know how pagination is work in codeigniter then please go through first that tutorials.
In previous tutorial we already created all needed file for our pagination so let's continue with those files. Below image was our file structure.
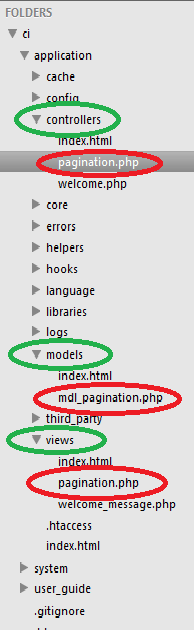
For ajax pagination let's update our controller file i.e. pagination.php
We just added few parameter in pagination config for some basic design. Now lets update our view file
this is our view file we don't need to change in modal file for this. Now you are wondering what's going on view file i will explain but first let's check how our view file look like.

Let's back to our code i hope you know jquery because we are using jquery with ajax. All magic goes with this below code.
After document load if user click on one of the pagination link then we have to first remove default behaviour of anchor tag to remove that we use
I did this all thing because to give you optimize code for ajax pagination in codeigniter.
In previous tutorial we already created all needed file for our pagination so let's continue with those files. Below image was our file structure.

For ajax pagination let's update our controller file i.e. pagination.php
<?php if ( ! defined('BASEPATH')) exit('No direct script access allowed');

class Pagination extends CI_Controller {

 function __construct(){
  parent::__construct();
  $this->load->model('mdl_pagination');
  $this->load->library('table');
  $this->load->helper("url");
 }

 public function country($offset=null)
 {
  $this->load->library('pagination');

  $config['base_url'] = base_url().'pagination/country/';    // url of the page
  $config['total_rows'] = $this->mdl_pagination->countcountry(); //get total number of records
  $config['per_page'] = 10;  // define how many records on page
  $config['full_tag_open'] = '<ul class="pagination" id="search_page_pagination">';
  $config['full_tag_close'] = '</ul>';
  $config['cur_tag_open'] = '<li class="active"><a href="javascript:void(0)">';
  $config['num_tag_open'] = '<li>';
  $config['num_tag_close'] = '</li>';
  $config['cur_tag_close'] = '</a></li>';
  $config['first_link'] = 'First';
  $config['first_tag_open'] = '<li>';
  $config['first_tag_close'] = '</li>';
  $config['last_link'] = 'Last';
  $config['last_tag_open'] = '<li>';
  $config['last_tag_close'] = '</li>';
  $config['next_link'] = FALSE;
  $config['next_tag_open'] = '<li>';
  $config['next_tag_close'] = '</li>';
  $config['prev_link'] = FALSE;
  $config['prev_tag_open'] = '<li>';
  $config['prev_tag_close'] = '</li>';
  $config['page_query_string'] = FALSE;

  $this->pagination->initialize($config);

  $data['country'] = $this->mdl_pagination->getcountries($config['per_page'],$offset);
  $this->load->view('pagination',$data);
 }

}
We just added few parameter in pagination config for some basic design. Now lets update our view file
<html>
<head>
 <link rel="stylesheet" href="http://maxcdn.bootstrapcdn.com/bootstrap/3.3.5/css/bootstrap.min.css">
 <script src="//code.jquery.com/jquery-1.11.3.min.js"></script>
 <script src="http://maxcdn.bootstrapcdn.com/bootstrap/3.3.5/js/bootstrap.min.js"></script>
</head>
<body>
 <div id="container">
  <h1>Countries</h1>
  <div id="body">
  <?php
   $this->table->set_heading('id', 'code', 'name');
   echo $this->table->generate($country);
   echo $this->pagination->create_links();
  ?>
  </div>
 </div>
   <script type="text/javascript">
   $(function(){
    $('body').on('click','ul#search_page_pagination>li>a',function(e){
      e.preventDefault();  // prevent default behaviour for anchor tag
      var Pagination_url = $(this).attr('href'); // getting href of <a> tag
     $.ajax({
      url:Pagination_url,
      type:'POST',
      success:function(data){
       var $page_data = $(data);
       $('#container').html($page_data.find('div#body'));
       $('table').addClass('table');
      }
     });
    });
   });
  </script>
</body>
</html>
this is our view file we don't need to change in modal file for this. Now you are wondering what's going on view file i will explain but first let's check how our view file look like.

Let's back to our code i hope you know jquery because we are using jquery with ajax. All magic goes with this below code.
<script type="text/javascript">
   $(function(){
    $('body').on('click','ul#search_page_pagination>li>a',function(e){
      e.preventDefault();  // prevent default behaviour for anchor tag
      var Pagination_url = $(this).attr('href'); // getting href of <a> tag
     $.ajax({
      url:Pagination_url,
      type:'POST',
      success:function(data){
       var $page_data = $(data);
       $('#container').html($page_data.find('div#body'));
       $('table').addClass('table');
      }
     });
    });
   });
  </script>
After document load if user click on one of the pagination link then we have to first remove default behaviour of anchor tag to remove that we use
e.preventDefault();after that using "this" we got url of that clicked anchor tag after that call that url using ajax method. on success function of ajax we getting return data in "data params". We store that "data params" in jquery "$page_data". After that we have to find "div#body" from "$page_data" because all our pagination data in that div. After finding data we have to replace old data with new data in "#container" div. We will get next page data on our same page without refreshing page. The last line
$('table').addClass('table'); is just for design part. I am using same controller function for fist time load and ajax call you can separate both function and also i am loading same view for both call you can also separate both file then you don't need to write so much jquery in ajax success function you have just do something like this
success:function(data){
       $('#container').html(data));
       $('table').addClass('table');
      }
I did this all thing because to give you optimize code for ajax pagination in codeigniter.
Please comment down below if you have any query and please follows us for more awesome tutorials and keep motivating us .

